Learning Objectives
- API
- Flask
- Creating an API from a machine learning model using Flask
- HTTP Methods
- JSON and jsonify
- Testing your API in Postman
You might be thinking:
"Now that I have built the ML model and saved it, I should be able to deploy it directly."
Well, not really.
Think about how an investor or a non-data science person will be able to use your model. Will she/he be able to load it and run it?
What you’ll do in such a case is create a simple interface (possibly a web application) for the person to interact.
There are several things we need to put together for the web app.
The first two are:
- The Python code that will load our model, get user input from a web form, make predictions, and return results.
- The HTML templates that flask with render. These allow the user to input their own data and will present the results.
Let’s get started with the 1st one in this unit.
What are APIs?
In simple words, an API is a (hypothetical) contract between 2 softwares saying if the user software provides input in a pre- defined format, the latter will extend its functionality and provide the outcome to the user software.
A majority of the cloud providers, and smaller machine learning focused companies provide ready-to-use APIs. They cater to the needs of developers/businesses that do not have expertise in ML, who want to implement ML in their processes or product suites.
Google Vision API is an excellent example which provides dedicated services for Computer Vision tasks.
Web Service/API
Now, you might think what is a web service?
Web service is a form of API only that assumes that an API is hosted over a server and can be consumed.
Web API, Web Service - these terms are generally used interchangeably.
Flask
Coming to Flask, it is a web service development framework or a micro-framework built in Python, which means it provides various tools and libraries for building web applications.
It is not the only one in Python, there are couple others as well such as Django, Falcon, Hug, etc.
Flask is very minimal and easy to learn and start working with—as long as you understand Python.
Why Flask
Basic benefits:
- Easy to use.
- Extensively documented.
- A good tool to get started with model deployment.
Advance benefits:
- Built-in development server and debugger.
- Integrated unit testing support.
- RESTful request dispatching.
It’s okay if you don’t understand some of the terms above. You’ll appreciate Flask as you use it.
Pipeline for deployment of a Machine Learning model
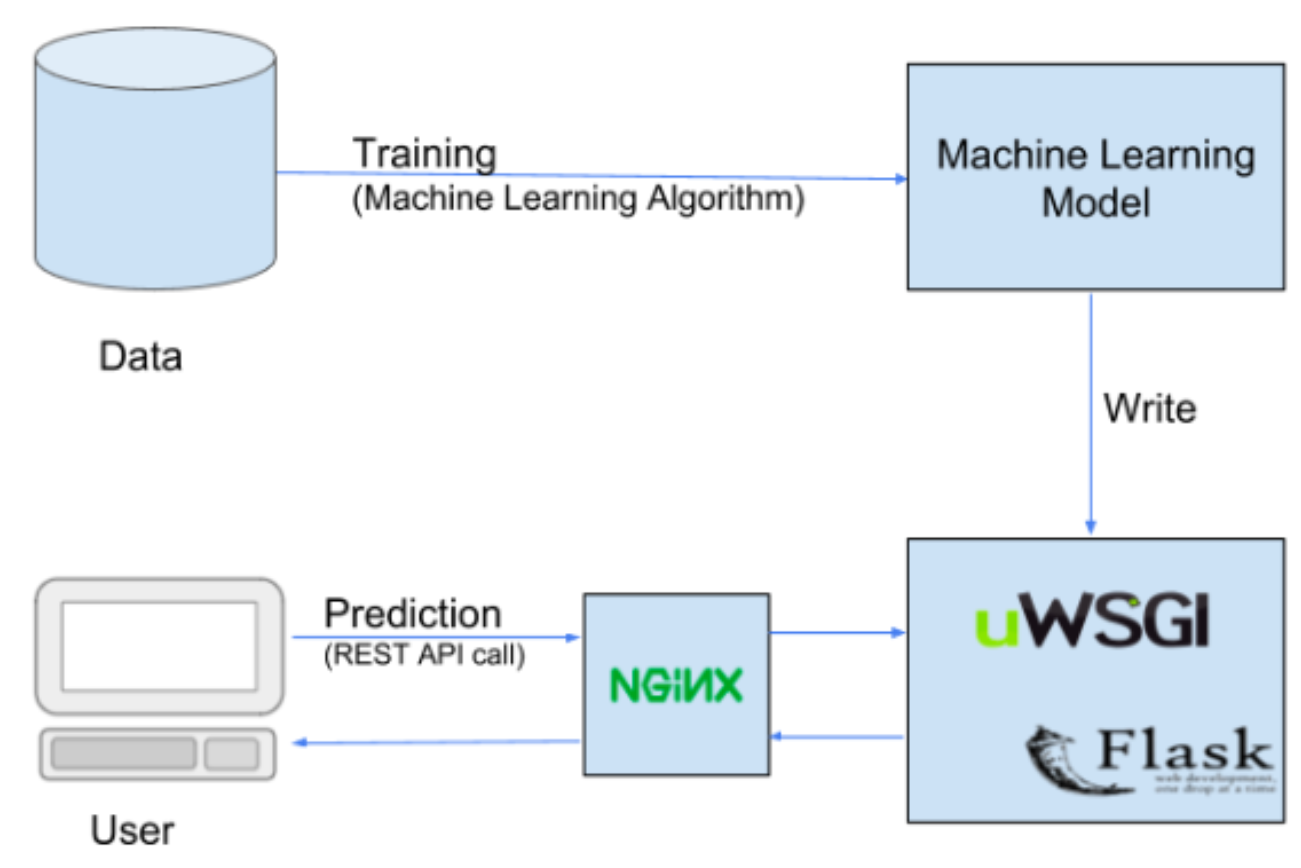
- Jupyter Notebooks are great for anything related to markdowns, R and Python. But when it comes to building a web server, it may show inconsistent behavior. So, it is a good idea to write the Flask codes in a Python IDE or text editor like Sublime and run the code from the terminal/command prompt.
You can download Sublime from here. - Make sure you don't name the file as flask.py or it might create some conflicts.
- Flask runs on port number 5000 by default.
Installing Flask
If you downloaded the Anaconda distribution, you already have Flask installed. Otherwise, you will have to install it yourself with:
1
pip install flaskCreating an API from a machine learning model using Flask
For serving your model with Flask, you will do the following two things:
- Load the saved model into memory when the application starts.
- Create an API endpoint that takes input variables, transforms them into the appropriate format, and returns predictions.
A Flask application is nothing but a Python file (a file saved with .py extension) that utilises Flask.
The basic template of any Flask file is like:
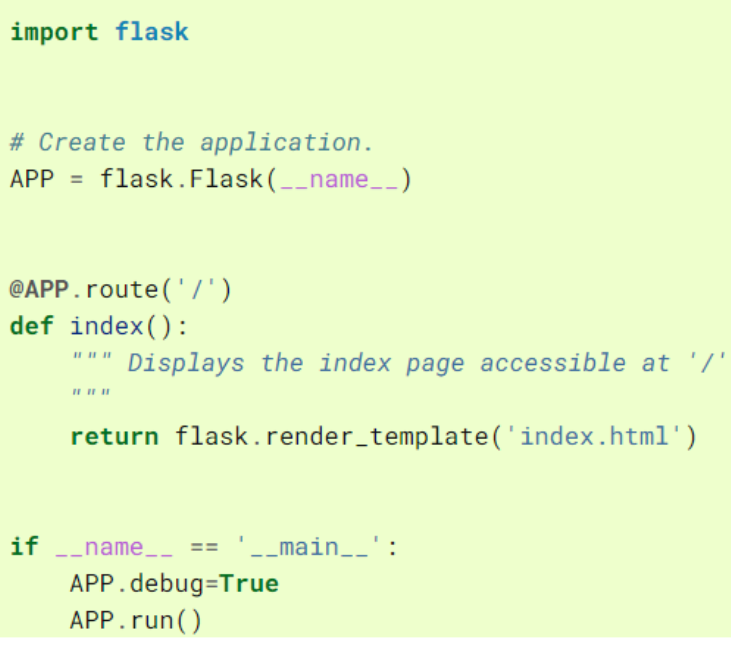
In order to test Flask installation, type the following code in the editor and save it as ‘app.py’. Note that the underscores being used are double underscores and not single.
1 2 3 4 5 6 7 8 9from flask import Flask app = Flask(__name__) @app.route('/') def hello_world(): return 'Hello World!' if __name__ == '__main__': app.run(debug=True)
For running the file, if you’re in sublime, you can simply do Ctrl+B.
Otherwise, you can type python app.py or flask run in the terminal.
You will see an output like this:
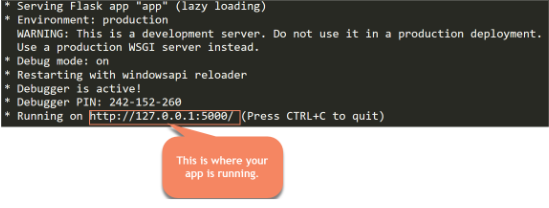
Copy the link displayed and paste it in your browser. (The default port will be 5000 unless you specify it otherwise).
And you’ll be able to see this on the link:
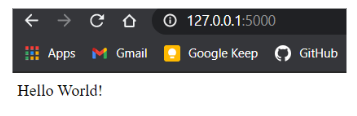
Did we just create a basic functioning website? Yes we did!!
If you want the website to stop running, you can press Ctrl+C in the terminal or simply close the window.
Understanding the Code
Let’s understand the components of our Flask application briefly. We don’t need to go into much detail at the moment.
- Flask constructor takes the name of current module (name) as argument.
- The route() function of the Flask class tells the application which URL should call the associated function. It has the syntax: ➔ The rule parameter represents URL binding with the function i.e on which URL will the function be called.
1app.route(rule, options)
➔ The options is a list of parameters to be forwarded to the underlying Rule object i.e what parameters should we pass when accessing a URL.
In our example, ‘/’ URL is bound with hello_world() function. Hence, when the home page of web server is opened in browser, the output of this function will be rendered(displayed).
For understanding how route triggers different functions on different URLs, let’s take the example of the DPhi website.
- If you go to https://aiplanet.com// , you’ll land at the home page. The route defined here might be something like
1 2@app.route('/') def home(): - Now, if you go to https://aiplanet.com/courses/ , you’ll land at the courses page where you’ll see content different from what was present at the home page. There are a number of courses here. The route defined here might be something like:
1 2@app.route('/learn') def courses():
Similarly, many other routes can be defined. These are also called endpoints.
Did you get it now how different routes can perform different tasks?
- Finally the run() method of Flask class runs the application on the local development server. This is what we call running an application locally. Its syntax is as follows:
All parameters are optional.1app.run(host, port, debug, options)
➔ host defaults to 127.0.0.1 (localhost).
➔ port defaults to 5000
➔ That is why the default URL of the website is http://127.0.0.1:5000/. This can also be accessed by the URL localhost:5000
A Flask application is started by calling the run() method. However, while the application is under development, it should be manually restarted for each code change. To avoid this inconvenience, enable debug support. The server will then reload itself if the code changes. It will also provide a useful debugger to track the errors, if any, in the application.
The Debug mode is enabled by setting the debug property of the application object to True before running or passing the debug parameter to the run() method.
1
app.run(debug=True)HTTP Methods
HTTP protocol is the foundation of data communication in world wide web. Different methods of data retrieval from specified URL are defined in this protocol.
The following table summarizes different HTTP methods −
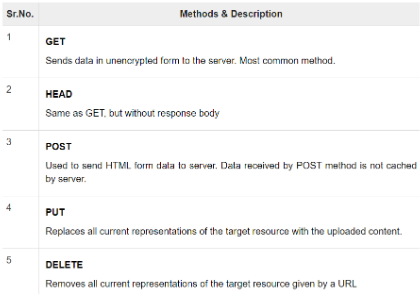
In short, when a user loads your website, a GET request will occur. Whereas, when a user submits some input to get a predicted output, POST request will occur.
The default request Flask responds to is GET request. However, this preference can be altered by providing methods argument to route().
JSON and Jsonify
Remember that we learned about JSON in one of our previous units? Python supports JSON through a built-in package called json.
- json.loads() function is used to convert JSON object to dictionary.
- jsonify() is a helper method provided by Flask to properly return JSON data.
flask.request.form
In any web app, you’ll have to process incoming request data from users. Flask, like any other web framework, allows you to access the request data easily.
Flask extracts the data from the form with the flask.request.form functionality, which works like a dictionary. We can grab the data we want from the form by referring it to the name. This name will be set in our HTML template, later on.
Testing your API in Postman
In order to test your API, you will need some kind of API client.
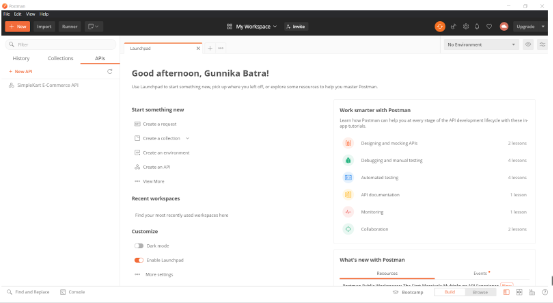
Postman is undoubtedly one of the best ones out there. You can easily download Postman from here. This is how the Postman application will look like:
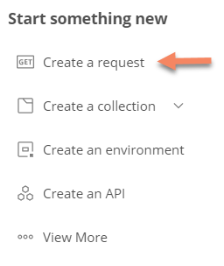
In order to start providing input in the form of GET or POST request, you need to click on ‘Create a request’ under the “Start something new” section.
Basic Structure of a Flask web app
The most basic structure of a Flask app looks like this:
webapp/
├── model/
│ └── saved_model.pkl
├── templates/
│ └── index.html
└── app.py
- Here, webapp is the name of the folder that comprises ALL the files that will be required for the application.
- saved_model.pkl inside the model folder is the model we pickled earlier and that can be directly loaded and used.
- index.html inside templates defines how our website will look like.
- app.py is the main code of the Flask app that defines the URLs at which user can access the app and handles the operations performed by the user by displaying an appropriate result.
The directory structure
The structure of all the files that’ll be used in creating the application for predicting Bengaluru’s Home Prices will be somewhat like this:
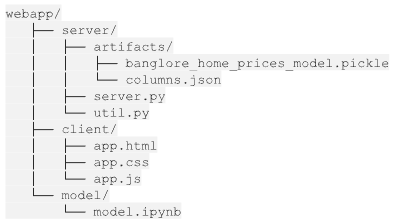
Creating the model folder is completely optional as that won’t be required in your application. We’ll mainly be working with the server folder in this unit.
Artifacts are nothing but the model you saved as a pickle and the column names you saved as a json file.
Writing the main logic
We now know how to create a basic Flask app now and have some knowledge about HTTP Methods. We are also equipped with Postman - a tool that’ll help us test the API we create.
Now, you’ll be completely able to follow along the next video that covers writing the actual Python code that will load our model, get user input from a web form, do predictions and return results. You’ll even be testing that out with Postman.
Unless you do it along and create the website on your own, you won’t be able to understand it properly. If you get stuck anywhere, we are there to help you out.
You can find all the files created and used in the tutorial here: https://github.com/dphi-official/Micro-Courses/tree/master/Introduction_Model_Deployment/server
The functions in util.py can also be incorporated inside server.py itself. A separate file was created just to make things more organised.
Okay, so what does our API do?
- When a user accesses the /get_location_names route, it simply returns all the locations in Bengaluru for whom price predictions can be made.
- When a user accesses the /predict_home_price route, it expects the user to fill in some details about the home. After those details are filled in, the API sends those details to the model and generates a prediction. The prediction is then displayed to the user.
Note: You always need to pre-process any input data in the same way you processed your training data.
That is, if you performed scaling on the train data, make sure you scale the inputs as well.
Congratulations! You just built your first ever machine learning API.
Your API can predict the price of a house in Bengaluru given their total square feet area, location, bhk and no. of bathrooms.
Next, you’ll call it from your front-end code and process the output of the API into something fascinating.
References
- https://www.tutorialspoint.com/flask/index.htm
- https://www.datacamp.com/community/tutorials/machine-learning-models-api-python
- https://blog.cambridgespark.com/deploying-a-machine-learning-model-to-the-web-725688b851c7
Slide Download Link
You can download the slides for this unit from here.