Tip: If you don't have context about Google Colab & Jupyter notebook, please refer to the Pre-requisites For Deep Learning Bootcamp course.
Learning Objectives
- CPU, GPU, and TPU
- GPU Packages for Deep Learning
- Setting Up TensorFlow
- Importing TensorFlow and checking its version
Tip: You DON'T need to memorize the below jargons!
CPU, GPU, and TPU
CPUs
The CPU or Central Processing Unit is the primary component of a computer that processes instructions. It's called the brain of the computer.
GPUs
GPU stands for Graphics Processing Unit. You'll also see GPUs being referred to as graphics cards or video cards. Every PC uses a GPU to render images, video, and 2D or 3D animations for display. A GPU performs quick math calculations and frees up the CPU to do other things.
The introduction of GPUs led to the rise of gaming industries and industries that provide high-quality visuals. GPUs are not only used in machine learning work but are also highly useful for content creators, digital artists, and gamers.
GPUs play a crucial role while training Deep Learning models. To learn what makes them so important, we would recommend you to go through a very interesting article below that explains why GPUs are necessary for training Deep Learning models:
Why are GPUs necessary for training Deep Learning models?
TPUs
Tensor Processing Unit, i.e., TPU, is a designated architecture for DL/ML computation designed by Google. It's not a generic processor; only Tensorflow models can run on it.
TPU outperforms CPU and GPU for various Deep Learning models in terms of predictions per second.
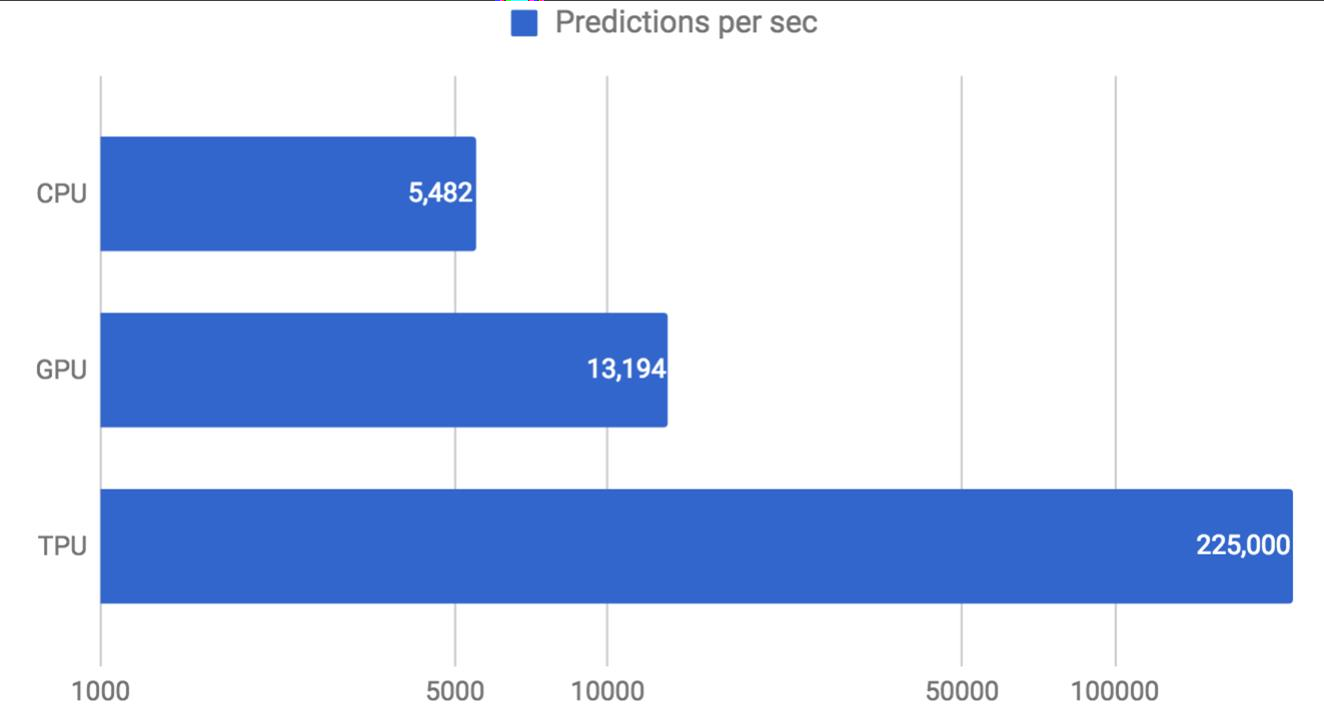
Source: Sato et al. 2017.
If you wish to know more about TPUs, you can read this article: https://cloud.google.com/tpu.
Why GPU and TPU?
CPUs can be used to train the model where data is relatively small. GPUs were introduced as CPUs were slower when dealing with data that required massive computations.
In a nutshell, GPUs and TPUs reduce the computation time to efficiently train a deep learning model when large datasets need to be processed.
GPU Packages for Deep Learning
For performing Deep Learning operations, 2 GPU Packages are configured while installing TensorFlow. These are:
- CUDA: CUDA is NVIDIA's language/API for programming on the graphics card. It is one of the easiest ways to write high-performance programs run on the GPU.
You can accelerate deep learning and other compute-intensive apps by taking advantage of CUDA and the parallel processing power of GPUs. - cuDNN: The NVIDIA CUDA Deep Neural Network library (cuDNN) is a GPU-accelerated library for deep neural networks.
It is built using CUDA and provides GPU accelerated functionality and highly tuned implementations for common operations in deep neural nets.
Deep learning researchers and framework developers worldwide rely on cuDNN for high-performance GPU acceleration. It allows them to focus on training neural networks and developing software applications rather than spending time on low-level GPU performance tuning.
Setting up TensorFlow
- Option 1: Google Colab. Colab is a virtual environment that doesn't need any installation on your device (besides the Google Chrome browser).
You just need to go to the following URL: http://colab.research.google.com/ and configure your environment to run Deep Learning models. - Option 2: Installing Tensorflow on your device
Option 1: Google Colab (Virtual Environment - No installation required)
- Google offers Google Colab (an online version of Jupyter notebooks) that is an easy-to-use and interactive data science environment.
- Not just that, Google Colab offers you up to 12 GB RAM, a GPU, etc., for free, and 100 GB storage.
So, you don't need to worry about installing a bulky Python application on your laptop/computer. - Google colab registration: https://colab.research.google.com/
- Tensor Processing Units, i.e., TPUs, have been recently added to Google Colab, making it even more attractive for quick-and-dirty machine learning projects when your local processing units are not fast enough.
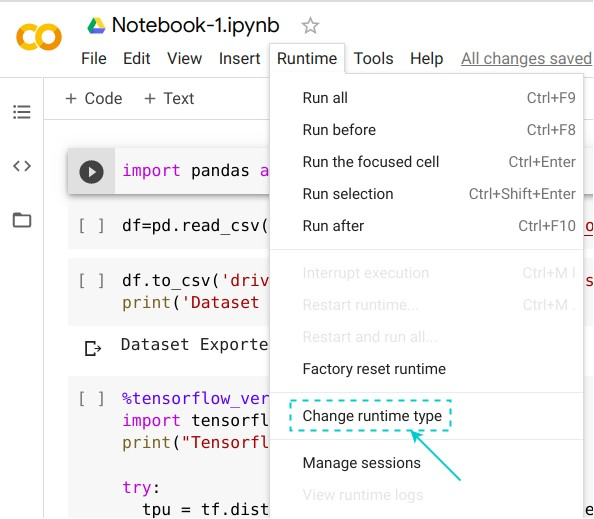
- The ability to choose different types of runtimes is what makes Colab so popular and powerful. Here are the steps to change the runtime of your notebook:
- STEP 1: Click 'Runtime' on the top menu and select 'Change Runtime Type':
- Step 2: Change the runtime according to your need:
- To install Tensorflow on Colab, open your Colab notebook and type the following command:
1!pip install tensorflow
Once the installation is done, run the below command to import tensorflow:
1import tensorflow as tf
Option 2: Installing on Your Device
To install Tensorflow on your device, open your Jupyter notebook and type the following command:
1
!pip install tensorflowOnce the installation is done, run the below command to import tensorflow:
1
import tensorflow as tfA simple video explanation of tensorflow installation can be found on the next slide.
Checking the version of TensorFlow
- Open a Jupyter/Colab Notebook. In a cell, type and execute the following command:
1import tensorflow as tf
1print(tf.__version__)
(Note the double underscores on both sides of the word 'version') - Ensure the displayed version starts with 2, i.e., ensure Tensorflow 2 has been installed. If not, you can upgrade Tensorflow:
Upgrade using pip: https://stackoverflow.com/a/47342614
Upgrade using conda:.1conda upgrade tensorflow-gpu - Google Colab uses TensorFlow 2 by default.
Additional Resources on Installation!
Intermediate/advanced Learners can explore this option. For the rest, we can gradually get there whenever required. For now, you can go with Google Colab, or the device installation mentioned a few slides earlier.
You can download the slides for this unit here.